


AirGlam™ Pro
AirGlam™ Pro
Dry, curl, straighten, & volumize in just 5 minutes with zero heat damage!
All-In-One Tool
All-Day Lasting Style
Zero Heat Damage Technology
Salon Quality Results Guaranteed

Couldn't load pickup availability
Estimated Delivery: - - -.
-

Similar to the dyson airwrap, but for some reason the dyson wouldn't work on my hair (the curling attachment). I tried this one and it works perfectly. I also love how it keeps my hair healthy without any heat!
-

I been using the AirGlam for a year now and I don't even use heat spray! This tool gives me that salon look without damaging my hair, crazy.
-

Crazy how this is a 5 in 1 tool, yet it beats all the other 1 in 1 tools in terms of results and because it doesn't damage my hair. Best hair styling tool ever.


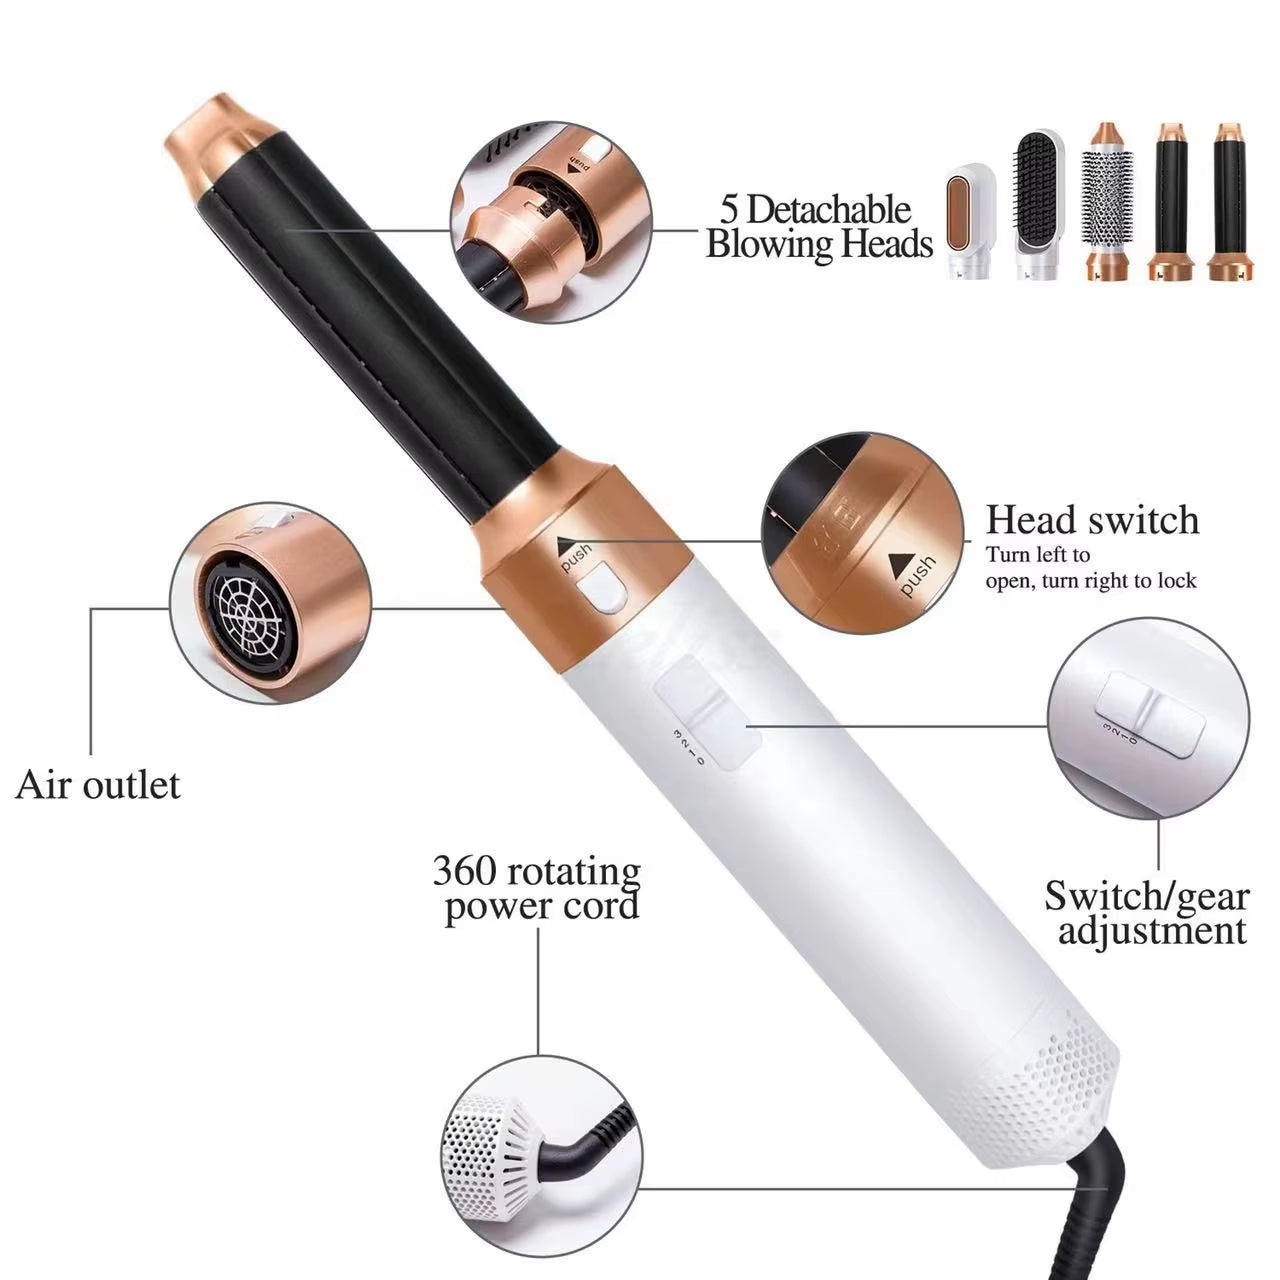
In The Box
In The Box
1x AirGlam Pro Body
2x Curl Wrap Attachments
1x Negative Ion Diffuser Attachment
1x Smooth Straight Brush Attachment
1x Volume Round Brush Attachment
Description
Description
The AirGlam Pro now uses an innovative, award-winning HairHealth™ Technology that removes heat damage whilst keeping the curl, dry, volume, and straightening technology.
With 5 essential hair attachments, you can now have salon quality results at home with one tool.
Our Guarantee
Our Guarantee
We guarantee full satisfaction and salon quality results. But if you are unsatisfied for any reason, please let us know and we'll initiate a full refund, no questions asked.

AirGlam™ Pro


HairHealth™ Technology: The New Era of Hair Styling
AirGlam Pro uses HairHealth™ Technology, a breakthrough airflow system that styles your hair using a controlled, low-heat airstream instead of direct high-temperature plates. It also uses the Coanda effect and automatically regulates temperature at a hair-safe 105 °C.
The result? Gorgeous, salon-quality hair that remains healthy, strong, and vibrant.
The Only Tool You'll Ever Need


We Don't Just Make Hair Stylers...
We redefine them.

|
Others | |
|---|---|---|
| HairHealth™ Technology | ||
| Negative Ion Dryer | ||
| All-Day Lasting Results | ||
| Style In Under 10 Mins | ||
| Cost-Effective | ||
| 5-In-1 Tool |

Frequently Asked Questions
How does it prevent heat damage?
How does it prevent heat damage?
The AirGlam Pro uses HairHealth™ Technology, a breakthrough airflow system that styles your hair using a controlled, low-heat airstream instead of direct high-temperature plates. Each pass releases a precise flow of air that wraps around your hair (using the Coanda effect) and automatically regulates temperature at a hair-safe 105 °C, well below the level that causes breakage or cuticle damage.
Because the tool relies on air-powered styling, not scorching metal, it still delivers the same drying, curling, straightening, and volumizing effects you’d get from traditional hot tool, without dehydrating or weakening your strands. The result: salon-quality styling that keeps your hair healthy, shiny, and strong with every use.
Is it suitable for all hair types?
Is it suitable for all hair types?
When developing the AirGlam™ Pro, we made sure it was suitable for all hair types.
Whatever your hair type and length, the AirGlam gives you maximum styling flexibility with 5 different accessories.
Why is the AirGlam so affordable?
Why is the AirGlam so affordable?
The question is legitimate and the answer is very simple. When developing the AirGlam™ Pro, our main aim was to make it accessible to everyone.
We cut costs considerably by offering online sales only. This allows us to focus our budget on the product without sacrificing quality.
HOW TO: The Curling Barrels
HOW TO: The Curling Barrels
There are two curling barrels (left/right)
- Left-Rotating Attachment: For curls counter-clockwise, recommended for the left side of the head.
- Right-Rotating Attachment: For curls clockwise, recommended for the right side of the head.
Instructions:
- Start with hair that is 80-90% dry. Choose the direction of the curl, then attach the corresponding barrel.
- Section 2-3 strands of hair from each other. Expert tip: Apply styling products if desired.
- Take a strand of hair approximately 1-2.5 cm wide and hold it 10 cm from the ends, ensuring the ends are free.
- Turn on the styler. Move the styler behind the hair ends and let the ends automatically wrap around the middle of the attachment.
- Once the ends are gripped, let the styler work for 5 seconds, then gently pull it away to release the curl, ensuring the styler is not turned during this process.
- To achieve perfect curls and prevent heat damage, keep the hair tensed around the attachment for 5 seconds in the same position and let it cool down. For optimal results, repeat until the hair is dry.
Additional Styling Tips:
- Use narrower strands for more defined curls.
- Use hair clips to prevent unwanted hair from being wrapped in the curler.
- Prepare more voluminous or curly hair for curling by straightening it with the paddle brush beforehand.
HOW TO: The Volumizing Brush
HOW TO: The Volumizing Brush
Achieve More Volume for Your Hair
Volumizing Brush Attachment
Step-by-Step Guide:
- Start with Damp Hair: Begin with hair that's about 60% dry or towel-dried. For added effect, apply your favorite hair products or styling agents.
- Section Your Hair: Divide your hair into sections according to your preference. For voluminous blowouts, start by placing the round brush close to the roots underneath the hair.
- Roll Outward: Place the brush at the roots and roll it outwards to the tips, letting the bristles gently grasp your hair.
- Repeat: Continue the rolling action with the remaining sections until your hair is styled into a light, voluminous look.
Additional Styling Tips:
- For fine hair, try reducing the airflow to minimize frizz.
- For thicker hair, consider increasing the heat to achieve results faster.
- If you have curly or wavy hair, increase the heat to achieve a smooth style.
Remember to always use the brush in the direction of the roots for the best volumizing effects, and adjust the temperature according to your hair type to prevent heat damage.
HOW TO: The Straightening Brush
HOW TO: The Straightening Brush
Achieve Sleek and Smooth Hair
Straightening Brush Attachment
Step-by-Step Guide:
- Start with Partially Dry Hair: Begin your styling routine with hair that's about 50% dry to maximize volume building.
- Root Placement: Position the brush at your roots to allow the detangling bristles to grab and smoothly style your hair.
- Smooth Downward: Brush from the roots to ends in a curved motion to harness the brush’s smoothing bristles for a sleek finish.
- Repeat for All Strands: Continue with the rest of your strands until you achieve a polished, voluminous style.
Additional Styling Tips:
- For fine hair, minimize air flow to reduce frizz.
- For thick hair, try smaller sections for smoother results.
- For wavy or curly hair, use smaller sections and repeat the brushing to refine your smooth style.
HOW TO: The Diffuser
HOW TO: The Diffuser
Define Your Natural Curls
Diffuser Attachment
Step-by-Step Guide:
- Start with damp hair: Begin with hair that's about 60% dry or towel-dried.
- Position the diffuser at the roots: Gently place the diffuser near the scalp and pause, allowing it to softly gather the hair.
- Boost volume: Dry your hair upside-down while pressing the diffuser against the head. Focus on the roots and move towards the ends without disturbing the curls, to add body and fullness.
- Gently cradle the ends: If you want more definition, gather the hair from the tips upwards, letting the curls sit in the diffuser bowl.
Additional Styling Tips:
- For fine hair, try reducing airflow to minimize frizz.
- For thick hair, you may want to increase the heat slightly for faster results.
- For wavy or curly hair, experiment with different heat settings to find the best balance for your hair type, enhancing natural volume and curl definition without excess frizz.
How does your guarantee work?
How does your guarantee work?
If you're not completely satisfied with your AirGlam™ Pro, let us know within 60 days and we'll initiate a full refund once you return the product.
-

Free Shipping
On all orders worldwide
-

60-Day Returns
To provide a risk-free experience
-

100% Secure Payments
Secure & Encrypted Payments


